Thursday, May 31, 2012

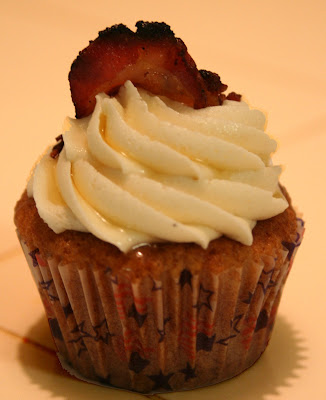
Gluten-free Bacon Cupcakes with Maple Butter Cream

Bacon for all occasions!

Several years ago when I was running my bakery I ran into the love of my life. He had an absolutely unreasonable obsession with bacon, which I found pretty charming at the time. Because of my endearing feelings for this individual I decided that as a baker I would do what I had told myself I would never do: create a bacon cupcake. I had heard of a number of people who had made bacon cakes and it seemed a little over the top in the love of the heart-stopping meat. Never the less, my early adoration of this silly man prompted me to create a bacon cupcake in his honor. 

Bacon cooking on pan

The bacon cupcake lived on my menu only being ordered by the extreme bacon lovers and adventurous eaters. Of course MacLeod has had them for each and ever occasion even convincing friends and family to try them. One bite and the speculative looks on their faces transformed into something else, usually joy. Eating the bacon cake made you a bacon believer if you weren't already. 

After leaving my bakery behind, I had not tried to make the cupcakes again after going gluten-free. But over time MacLeod had talked the about the cake to so many friends when they came into town their only request was about trying this strange cake. So I had my opportunity to convert the bacon cake into gluten-free and the love carried through in my intestinal friendly flours. 

My warning about these amazing spicy cakes is that 1. They are in no way healthy for you, gluten-free or conventional and 2. They are seriously amazing if you give them a chance. 

Gluten-free Bacon Cupcakes

MacLeod's Bacon Cupcake

Gluten-free Bacon Cupcakes with Maple Buttercream


2 C Gluten-free Flour Blend (located here)
2 tsp baking powder
1/2 tsp xanthum gum
1 1/2 tsp ground cinnamon
1/2 tsp fresh grated nutmeg
1/4 tsp ground allspice
1/4 tsp salt
2 eggs
1/2 C unrefined sugar
1 C rice milk
1/4 C maple syrup
1/4 C coconut oil
6 slices thick cut bacon
1/4 C reserved bacon drippings

Icing

1 C coconut oil, room temperature
2 1/2 C powdered sugar
1/4 C maple syrup, plus extra for topping


  1. In a heavy skillet, over medium-high heat, cook bacon until crisp on both sides. Set pan aside and let drippings cool. When the drippings are cool measure 1/4 cup and set aside. Mince 4 slices of bacon and set aside. 
  2. Combine flour, baking powder, xanthum gum, cinnamon, nutmeg, allspice and salt. 
  3. In the bowl of a stand mixer add eggs, milk, maple syrup and coconut oil and blend until well combined about 2 minutes. 
  4. One cup at a time, add the dry ingredients to the stand mixer bowl stirring after each addition until everything is combine. 
  5. Fold in the minced bacon. 
  6. Fill two cupcake tins lined (24 cupcakes) 2/3 full. 
  7. Bake for 15-20 minutes or until the tops of the cupcakes are a golden brown and they spring back when touched. Remove from oven and allow to cool completely before icing. 
  8. While the cupcakes cool, add the coconut oil and maple syrup the bowl of the stand mixer and whisk together. Slowly add the powdered sugar and mix slowly to not dust yourself with the sugar. 
  9. Beat the mixture until it can hold a peak, adding a little more sugar if needed. 
  10. Ice cupcakes, add a piece of the reserved bacon and drizzle them with maple syrup. 
Enjoy!

Gluten-free Multi-grain Flour Tortillas

Easy and Amazing Tortillas!

I sort of fell into making tortillas last night because honestly I was at a loss of what to make for dinner. I was tired after going on a cleaning rampage and wasn't feeling like cooking, at all. However, my family requires food so I had to get my wits about me and see what I was going to make. I had a pack of ground meat in the kitchen so I thought about one of my good ole fall backs: Soft Tacos. Yes. But then the problem came, kiddo hates corn tortillas but loves tacos. It would have made like easier if he would eat corn tortillas, but when are things terribly easy, that takes out all the fun, right? Sure. I also had purchased some gluten-free tortillas at the store, but when we tried them they seemed to crumble apart. So I looked about for some flour tortilla recipes. 

Gluten-free tortilla steps to make

One day on twitter I was very encouraged when a friend posted pictures of her gluten-free tortillas, so I thought that I must be able to do it. I searched and was finding some things here and there and ultimately decided to try a recipe from SeriousEats.com but I didn't have too much rice flour and really wanted to try to incorporate a few other grains for a healthier tortilla. So I decided, after my dumpling trials, that I would try to use a little more sorghum and millet for so chewiness and obviously so good health factors. I ended up with approximately a 3:2:1:1 flour ratio which seems to have worked out beautifully. I don't have a tortilla press, so the directions simply use a small wooded rolling pin to make the tortillas. 

Soft taco with gluten-free tortillas

The family LOVED these tortillas and honestly, they were pretty easy to make. 

Gluten-free Multi-grain Flour Tortillas 

(adapted from SeriousEats.com)
2/3 C rice flour
1/3 C sorghum flour
¼ C millet
¼ C potato starch
1/2 cup tapioca starch
2 teaspoons granulated sugar
1 teaspoon xanthan gum
1/2 teaspoon baking powder
1/2 teaspoon salt
2 tablespoons lard or vegetable shortening
3/4 cup cold water, plus more as needed

  1. Whisk together white rice flour, sorghum flour, millet, potato starch, tapioca starch, granulated sugar, xanthan gum, baking powder, and salt. Using a fork or pastry blender, cut in shortening into flour blend until the flour blend looks grainy.
  2. Add 1/2 cup water. Stir into dough using a wooden spoon. Dough will be dry. Add additional 1/4 cup water. Stir. If dough begins to hold together, stop. If dough remains dry, add water, 2 tablespoons at a time. Add water by the tablespoon only until the dough comes together when you start to press on it.
  3. Turn dough onto generously white rice floured countertop. Begin to knead dough until its smooth. It should not stick to your hands nor should it be wet. If the dough seems dry, add a tablespoon of water. If the dough is too wet, knead in additional flour. To test the consistency, pinch off a generous tablespoon and roll it between your palms. The dough should form a ball easily and not stick to your hands. Cover dough with plastic wrap.
  4. Heat a cast iron (or heavy skillet) on medium-high heat.
  5. Pinch off about two tablespoons of dough. Roll into a ball in your hand and then slightly start to press out the ball with your fingers to flatten it a bit. Place on the floured surface and using a small rolling pin start to roll out the ball, rotating it after eat roll to keep a round shape. As you roll the dough, you may need to add a little more flour under the dough and a little on top to keep the pin from sticking to the dough.
  6. Immediately after you have rolled the dough flat, place on the heated skillet. When the surface of the tortilla starts to get little bubbles rising up it’s time to flip it over, about 1-2 minutes at the most. When the tortilla starts to get bubbles underneath, making the tortilla rise a little, it is time to pull it off.
  7. Repeat with the all the dough, one tortilla at a time until all the dough has been used. After pinching off dough, return the remaining portion to the plastic bag to keep it moist. As you pull tortillas from the pan, place them on a place covered to keep them warm.

Tortillas are best served right away. However, they can be stored overnight in a sealed plastic bag. Heat before serving to soften.

Enjoy!

Wednesday, May 30, 2012

Gluten-free Bento Lunches, Part 1: Getting Started

Bento: Getting Started


Any parent who has embarked on changing their families diet to gluten-free has come across the dreaded question: what about school lunches? After Jaime Oliver's Food Revolution a few years back in American public school systems, I started to really try to get my kids off of school lunches altogether. Going gluten-free was something that was not only going to make home lunches an option, but a necessity.

I started my foray into gluten-free eating with bread. Bread is an absolute necessity in kiddo's diet and staple in our everyday lives. So I spent the first few months just working on perfecting a bread that my family would not only tolerate but actually enjoy. Though I am a fan of some healthier grains, my family is a white bread kind of crowd, so my White Sandwich Bread was born. Additionally, I had a way to make school lunches with a variety of sandwiches.

If anyone knows any child, they know that there is only so long that you can hand them a sandwich without a miniature revolt eventually taking place. Our lunch revolt happened only a few weeks into our gluten-free eating. Lil sis was fine with her sandwiches, but kiddo was tossing them. I guess I had the advantage that he at least was unable to lie to me about it, he is honest to a fault. So when one day I asked how his lunch was and I saw a knowing look on his face, I said "you're throwing them away, aren't you?" He said yes, so we had a sit down to talk about school lunches and how I can make them better for him. The answer came quickly, I was making boring lunches.

Garden Salad bento with apples and cheese

So I decided to research into how to make interesting lunches for my gluten-free kiddos and the answer came to me: Bento. I remember bento box lunches when I was a kid in school. I had a number of Asian friends who's moms prepared amazing looking lunches in cool little boxes for them. Since those days of watching my friends in dining awe, I never really thought about bento lunches until now. There are a number of great sites out there that are focused on bento lunches for kids and amazing ideas on how to keep kid's lunches interesting. With kiddo and his sensitivity to texture, taste, color and smell, it makes bento making a little it more of a challenge in addition to being gluten-free.

For this Gluten-Free Bento Lunches Series I will: 


  • Create at least 10 bento lunches over the next two weeks
  • Review materials for bento lunch making including containers and tools
  • Do at least 3 tutorial style entries to learn technique for bento making
  • Include at least 6 bento lunch recipes that you can build on


Bento making is a long tradition that we are just diving into so I am referencing some amazing bento bloggers like What's for Lunch in Our House, Lunch in a Box and Laptop Lunches as I get going.


My first try turned out to be a "Garden Salad" and "Garden Sandwich" for kiddo and lil sis. My first go into quiche was a fail, but the rest was received very well. Lil sis was thrilled with her salad and was showing off her "flowers" (apples and cheese made with cookie cutters shown above) I think kiddo is a little more apprehensive, but is now asking what his next bento is going to be. Yay! Next stop, stuffed sandwiches!

Wednesday, May 23, 2012

Asperger's and Standardized Testing

Standardized tests are like a painful rite of passage for each and every child at some point in their educations. Each state has various standards that children must meet to move on and progress in school and the school systems themselves are rated based on these scores.

In Virginia, the annual testing is called SOL or Standards of Learning. In my opinion, the acronym could have been chosen better, but by the time I was in high school it seemed to fit perfectly, SOL indeed.
Now, as an adult, it is time to prepare my own children for standardized testing and having a child with special needs can make things not only challenging but also nerve wrecking. By mid-year, the schools are starting to send home information about SOLs and the kids start practice testing and reviewing all they have learned since they began school in kindergarten.  

Each fall we have our Individual Education Plan (IEP) meeting to review kiddo’s situation in school and what accommodations need to be made or reviewed for the new school year. During these meetings we always discuss kiddo’s accommodations for standardized testing and now it is time for all those words to turn into action. It is kiddo’s first time sitting through lengthy standardized tests and I can’t help but be nervous. So, as I always do, I start my research into what I can do to help my kiddos not only survive SOLs and other standardized test but also thrive.

First and foremost I remind my kiddos that while testing is important, perfection is not. It is important that kids remember that no matter how well or poorly they do, it is just a test. Just like with report cards and other grades, we only expect them to try their hardest and will be happy if they do.

There are a number of things as a parent you can do to prepare not only your child but also your child’s teachers for upcoming standardized tests. Meeting with teachers and advisors to go over items for testing are important. Some may think its overkill, but I schedule a meeting either by phone or in person to do an IEP fresher before testing. Additionally I check in with the teachers to see how things are progressing and if they need anything else to help kiddo during testing after they have begun.  Based on what we have done to prepare the kiddos and my discussions with teachers I have compiled some tips. I am sure they will change or expand in the future, but here is a start.

           1. Know your child’s stress signs  


Kiddo usually doesn’t stim, but when he is done with a subject or is bored, he yawns. Yawning is his sign that he needs a break or things are going to get worse.

           2. Post a visible calendar for testing days


Kiddo and most Aspies thrive on schedules and structure. In our home we have monthly schedules posted so the kids know what to expect each day, testing days are highlighted. Preparing kiddo mentally for what to expect two days from now, one day from now and the morning of helps him get ready.

           3. Ask your child’s teach how you can help prepare


SOL prep starts almost immediately after winter break and goes into high alert after Spring Break in our region. The teachers start sending home study binders for the kids to start reviewing what they have learned so far that year. If your child’s teacher doesn’t do that, consider saving some of your child’s important class work or graded tests so that they can review material.

           4. Sleep!


We all know that we perform best when we are rested, but a good night’s sleep can also reduce anxiety and stress in your child for test days.

          5. Prepare nutritious meals 


It sort of goes without saying that food feeds the brain and helps kids function better. On testing days try to limit the number of sweets in meals and increase fiber and protein. I prepare lunches for the kiddos so that I know what they are eating especially on testing days.

         6. Ask your child how you can help them


While not each child cognitively knows what would best help them, I think it’s a great time to be able to discuss things with your child. It helps them to understand that they are a part of things and not just being told what to do.

         7. Talk about things post-testing


I find that discussing things with kiddo after the testing days is a great opportunity to see what helped him and what didn’t and how to change things in the future. It’s also a great time to lighten it up and eliminate any worry they may have about your expectations regarding scores.

Talk to your child’s teacher about:


          1. Offering regular breaks


When kiddo is stressed, he absolutely needs a break. If he is pushed to continue then all the behavioral issues really start to surface i.e. sensitivity to lights, sounds, smells etc. Each child has different responses, but not matter what the response, it is best to head it off by giving breaks.

           2. Adequate lunch breaks


Testing days can be stressful not only for the students but for the teachers as well. Getting the subject matter covered for the day can be challenging when each child goes at a different pace. However, lunch break is very important and should not be cut short to make more time for testing. It’s a time for the kids to take not only a mental break, but recharge their bodies with good nutrition to get through the rest of the day.

           3. Signs of stress


While as a parent you may know all your child’s signals that he/she is going into overload, their teacher may not. It’s important to discuss these items with teachers to help them best help your child.

           4. Items to help concentration


Kiddo is a fidgiter and keeps his hands occupied with small pieces of paper, erases or any other small item. He levels himself out with fine motor manipulation and it actually helps him concentrate. This isn’t the case for every child, but talk to your child’s teacher about tools that may help them stay focused during testing like fidget tools. You can find some great ones here


Each state is different on how standardized tests are administered, information from the Department of Education for Virginia’s testing expectations can be found here. One site that we find extremely helpful not only for standardized testing but also for online courses and help with special education resources is T/TACOnline: A Community linking people and resources and help children and youth with disabilities. At T/TAC Online there is a tab for enhanced SOL, a very helpful and informative page to prep your child for standardized testing.

With some good preparation, we can try to eliminate some of the negative stigma and anxiety that our kiddos have about standardized testing. Hopefully minimizing some of those fears can help make growing up just a little easier.

Monday, May 21, 2012

The Battle of the Shorts: Sensory Processing and Aspergers

In the late 1800's our country underwent the greatest battle on American soil. The Civil War was a battle that fought over the doctrines of slavery after Republican President Abraham Lincoln took office. Lincoln wished to limit the expansion of slavery through our country which eventually spurred the southern states to form a Confederacy and secede from the Union. Over four years through the east, battle after battle commenced. Here in our area was amongst one of the deadliest engagements: The Battle of Fredericskburg.

Fredericksburg was home to one of the most one-sided battles of the war with Union casualties doubling those of the Confederates. The plan had been for the Union to over take Frederickburg and head to the Confederate capital, Richmond. Union plans were trumped and the Confederacy held Fredericksburg while littering the countryside with Union soldiers.


Such is the Battle of the Shorts. Each and every spring the battle commences, a change. Change for our household is a declaration of war on kiddo. It starts with a simple enough trip to about a dozen clothing stores. Kiddos is always with us when we go clothing shopping because he has to see the clothing; the fabric, the seams, the print and the color. We maintain the advantage early in the days of the battle, we know the land and know where the dangers lie. With great calculation, summer clothing is purchased. The opposition lies in wait happily in his pants while the temperatures continue to rise.

Then the second engagement in the battle begins as one day the opposing force steps off the school bus, beads of sweat streaming down his face and shirt soaked in perspiration. I look at him and he stares right back at me. We both know that the time has come. The next morning the battle lines are clearly drawn and chaos erupts. Our early advantage in the battle was clearly presumptuous as the opposing force slings the brand new summer attire across the field of battle. Before we know it the field is strewn with the discarded bits of the mornings engagement, the advantage clearly to the opposition.

I would like to tie this battle up cleanly with our eventual victory, but there is truly no winner in the Battle of the Shorts. The battle rages on for weeks, sometimes months with casualties being pulled from the drawer; discarded and unused because of their wrongness. We would secede victory to the opposition if it weren't for the sweltering summer temperatures. Sometimes we win, sometimes we lose. Those times we lose we save our energy because we know that eventually we must prepare ourselves for Battle of the Socks in the fall.

Wednesday, May 16, 2012

Secret Ingredient Desserts #4: Chocolate Avocado Cake with Chocolate Ganache Filling


So I must admit that I have been simply dying to get avocado into my kids diets. Not only is it so tasty, but it gives you a wallop of good body stuff. I love avocado, sweet or savory, I try to incorporate it somewhere in our diets at least once a week. The kids though will not eat it. I mean for starters, it's green! While sis is an adorning salad eater and killer of anything sushi, she despises the look of avocado. Kiddo of course can not stand the look, texture and smell of it. So I am resigned to not have avocado in the kiddo's diets.... or am I?

I tried a few things to try avocado desserts for the kids, some of which they didn't mind. First I tried Chocolate Avocado Mousse and the first try was so avocado-y, I knew it wouldn't fly. I did work on a number of variations, but still was left wanting. 

Next I decided to try something in my comfort zone: cake! I started looking at a number of recipes for cakes that included avocado and came across this little number at Joy The Baker which used regular flour and a avocado buttercream, two things I knew first off I would have to change. I mean the unveiling of the secret ingredient was already rough, I wasn't about to stretch it with a green icing. I was intrigued by the recipe because not only was it dairy-free, butterless, and egg-free it, of course, included avocado!


So I tried the recipe that she had from Vegetarian in the Middle East (whose blog is no longer available) just eliminating the gluten-full flours with my flour blend and using an alternate icing. The result wasn't too bad, the kids liked it but MacLeod said it didn't really match my original chocolate cake (gluteny) from my bakery days. So I headed back to the beginning and started again. 

My second try I wanted to get something that was a little closer to the mix I used for my old cake recipe so I added chocolate and espresso and eliminated the oil. Additionally, I felt that the original recipe had a rather scant amount of avocado in it to offer enough nutrition per serving, so I doubled it. 

I baked up the second cake and to keep the gluten-free and casein-free cake on point decided that I would make up a coconut oil icing, something that I had been waiting to try for a while. Then because, well, I am a chocolate fiend, I made a ganache to fill the cake with. 

The resulting cake was a beauty and when I served MacLeod a slice he said it was my very best chocolate cake ever, which surprised the pants off of me. The kiddos think it is fabulous and even ignored me when I told them that there was avocado in it! 


Chocolate Avocado Cake with Chocolate Ganache Filling

2 ½ c gluten-free flour blend
6 Tbs unsweetened cocoa powder
½ tsp salt
2 tsp baking powder
2 tsp baking soda
2 C unrefined granulated sugar
1/3 C casein-free chocolate, melted
1 C soft avocado
2 C water, divided
1 tsp dry granulated espresso   
2 Tbs white vinegar
2 tsp vanilla extract

Casein-free Chocolate Ganche
2 lbs. casein-free chocolate
¾ C unsweetened rice milk

Coconut “Butter”cream
1 C Softened coconut oil
3 C powdered sugar
2-4 Tbs rice milk

Chocolate Ganache: 

It is best to start the chocolate ganache before you start the cake because the ganache needs time to set before using it.

Place chocolate in a heatproof bowl. In a sauce pan, heat milk until it is hot but not boiling. Pour milk over chocolate in the bowl and stir until the chocolate is melted and creamy. Set aside to set up to the consistency of peanut butter.

Cake:

1. Preheat oven to 350 degrees and spray two 8” cake pans with non-stick spray. 

2. In a food processor, pulse the avocado meat until smooth place in a medium sized bowl. 

3. In a large bowl, blend together flour, cocoa powder, salt, baking powder and baking soda.

4. In a measuring cup mix together 1/2 C hot water and the espresso. 

4. In the medium bowl with the avocado, add remaining water, espresso mix, vinegar and vanilla and blend well. 

5. In the bowl of a stand mixer (or in large bowl with a hand mixer) place sugar and melted chocolate and mix until blended.  Add the avocado mixture to the bowl and blend until combined.

6. One cup at a time, add flour mixture blending to combine after each addition. After last addition, let batter mix on medium speed for one minute. 

7. Divide batter between the two pans and place in preheated oven. Bake for about 30 minutes or until tooth pick comes out clean. 

8. Cool on a wire rack. 

Coconut “Butter”cream:

In the bowl of a stand mixer, add the softened coconut oil. With the whisk attachment, Whisk oil until it’s creamy.

Slowly add powdered sugar, blending after each addition, until it is combined. If the mixture gets a little dry, add 1 Tbs. at a time of the rice milk. Whisk icing until you have soft peaks.

*If the peaks are not forming, the coconut oil may be too soft. Place the bowl in the fridge to allow it to cool for about 10 minutes then whisk it again for about 30 seconds to blend. 

Refrigerate until ready to ice the cake.


Assembly:

When the cake is completely cooled, level the 8" inch rounds by using a long knife to cut off a top layer of the cake. Place the first round on a cake platter or display plate. Smooth a layer of ganache on the top of the first round. Place the second round of the cake on top of the ganache layer. Top with Coconut "Butter"cream icing.

Enjoy!

Monday, May 14, 2012

*Caution* Slow Blogger Crossing

It has been a rough week or so and I have completely neglected the blog. I pop in here and there but just can't muster the comprehensive skills to put words together. I had really wanted to do a Mother's Day post, but that seemed to get away from me too.
I have spent the last few weeks in varying degrees of flu-like stuff and its just been terrible. Obviously the result has been my lack of working in any way (you should see the house!)


But fear not folks, I am on my way back! I am strumming up a few posts this week including the last of the Secret Ingredient Desserts and some stuff about SOL(Standards of Learning) testing that kiddo and sis are starting this week. So be patient and I will be back and better than ever! (I hope!)

Tuesday, May 1, 2012

Secret Ingredient Desserts, Part 3: Sweet Potato

Let me start off by saying that I love sweet potatoes and just about all things sweet potato related. I remember as a child my mom would pack me up to head to my grandmother's for the day and before heading out the door I would grab my raw sweet potato which would be cooked up as part of my lunch.  Years later I recall having my first sweet potato french fries and feeling that I had just discovered the promised land (for my stomach). So of course I thought that my love of sweet potatoes would naturally be inherited by my children, but no. They must get their dislike of delicious nutritious foods from their father's side.
http://www.juicing-for-health.com/sweet-potato-health-benefits.html
So, nutrition you ask? Yes, there are so many things that make this orangey veggie wonderful for our bodies and an excellent reason to, if nothing else, hide it into your children's foods. First, they are loaded with Vitamin A, C, folate and tons good dietary fiber. Despite their sweetness, sweet potatoes are actually very low in sugar and calories. The provide your body with some much needed antioxidants as well as  fiber for digestive regularity. The vitamin C helps your body develop and maintain good body immunity and the folate an excellent addition to your bod, especially for pregnant women. One of the really great traits of the sweet potato, which makes it ideal for sweeter desserts, is that it is fantastic in helping your body regulate blood sugar.

So for this week, I decided that I would be utilizing my favorite root (not a tuber like its less sweet cousin the potato) into a form which my children would most certainly consume happily. Sweet potato pie? Nah, that's too easy and I have been wanting to work on a few new cake recipes. So I embarked on a search for a sweet potato cake recipe. I wasn't finding too much for what I was looking for, and started pulling things together into ratios that seemed to work for my basic gluten-free cake recipes. The first try was marginal. The kids actually really liked the cake, but it was super moist and when settled and cooled was pretty dense. So I started again and changed the ratios a bit and decided that I really wanted to use coconut oil (my latest obsession) in the recipe. The second shot was a hit with the kids and everyone else I had assigned as my sweet potato cake guinea pigs. When I told the kids that the secret ingredient was sweet potato, after the shocked look on their faces dissipated Little Sis squinted at me and said "your making us eat vegetables we hate without knowing it!" Yes, yes I am.


Spiced Sweet Potato Cake

2 1/2 C Gluten-free flour blend
2 tsp baking powder
2 tsp ground cinnamon
1 1/2 tsp ground ginger
1 1/2 tsp fresh ground nutmeg
1/4 tsp salt
1 tsp xanthum gum
1 1/2 C unrefined sugar
2 C sweet potato, cooked and mashed
1 tsp vanilla extract
3 eggs
1 C coconut oil

Honey Glaze

2 Tbs honey
1/2 C powdered sugar
1-3 tsp water

Preheat the oven to 325 degrees

Spray a 8" pan with cooking spray and set aside. 

In the medium sized bowl blend together flour, baking powder, spices, salt and xanthum gum. 

In the bowl of a stand mixer add sugar, sweet potato, eggs and coconut oil. One cup at a time, add the dry ingredients to the mixer while it is running on its lowest setting. Continue to mix until well blended, about a minute. 

Pour batter into the bundt pan and bake for about 45 minutes or until a toothpick comes out clean. This cake can be very deceiving when it's not completely baked, but a little golden, so be sure to check with a pick.  

Glaze: 
Combine honey and sugar in a small bowl and blend together. Add water, 1 tablespoon at a time until the glaze is just thin enough to pour. 

When cake has cooled, drizzle glaze over the cake. 

Enjoy!